
OK, if you’re here, we assume that you have completed the very basic account setting and frontend configuration process first.
(Disclaimer : as Yesbot is currently in a rapid development state, some screenshots and instructions may not be up-to-date with latest Yesbot available version)
Advantages of configuring the backend for Yesbot
Configuring your backend will allow the Yesbot platform to gather more information about your running code, and also, auto-discover your API endpoints, or use a LLM to enhance your tests base. This will require your backend to use technologies supported by the Yesbot platform.
We have different levels of backend configuration, each one allowing more advanced Yesbot features to be available :
- Level 0 frontend-only config : Tests generation from APIs endpoints tracking : Allows Yesbot to quickly use its basic tacking feature to generate a simple tests base. Requires the minimum amount of configuration of the tested application. No backend configuration required.
- Level 1 backend config : Tests generation from APIs endpoints auto-exploration : Yesbot client module will add endpoints in order to list all you backend’s exposed endpoints. Then the tests engines of the platform will create automatically tests cases to test your backend’,’s endpoints with trivial calls.
- Level 2 backend config : Idempotent tests with data writing : Yesbot client module will allow to pilot your backend,s database in order to create tests on your data-modifying endpoints, without you having to manage manually your testing database’s state.
- Level 3 backend config : Tests generation using LLM : Yesbot can use an LLM API (at this time, OpenAI’s) to augment your existing tests base.
This page will help you configure your tests environment for each level. Note that for now Yesbot only supports certain technologies for your backend application under test. We’ll detail that in each configuration level description.
Configuration walk through
For each section, we’ll present you an API backend example made with Java, Spring boot and Mysql.
Level 1 configuration (for auto-exploration)
This feature allows Yesbot to discover automatically your running backend application API endpoints, and extract basic tests from the gathered information, without any manual intervention.
Technological prerequisites
- Java 17
- Maven
- Spring
1) Add configuration keys
In your application under test main configuration file (application.properties or application.yaml), add the following keys and values :
# testbot config
testbotconf.api.exposed.baseURL=https://stardenizen.app:9967/petclinic
testbotconf.active=true
testbotconf.realtime=false
testbotconf.inventorer=true
testbotconf.backup=false
testbotconf.client.id=j.ratompo+user@gmail.com
testbotconf.client.key=<Your Yesbot key>
testbotconf.client.app=petclinic
- Change testbotconf.api.exposed.baseURL value to use your application backend URL : for instance «https://stardenizen.app:9967/petclinic». You can find this value in your Yesbot account, in section «my credentials», then in tab «User proxies». Choose a proxy and copy the value in the «Real backend URL» field. Then paste the value in your config file.

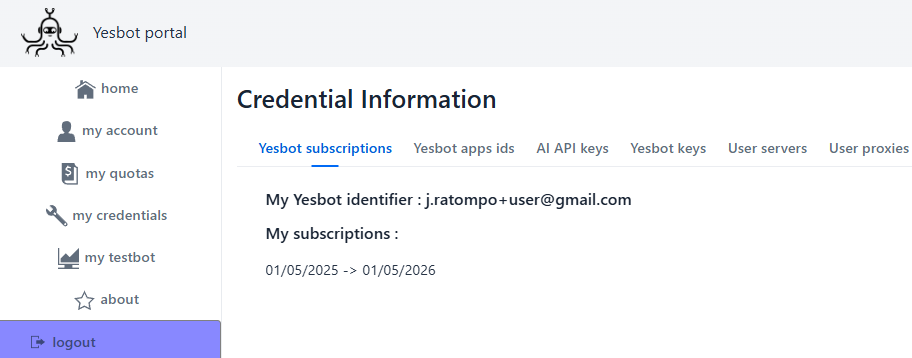
- Change testbotconf.client.id value to use your client ID, called «Yesbot identifier». You can find it in your Yesbot account, in section «my credentials», then in tab «Yesbot subscriptions». Copy the key value (without the date and spaces) in this view and paste it in your configuration file.
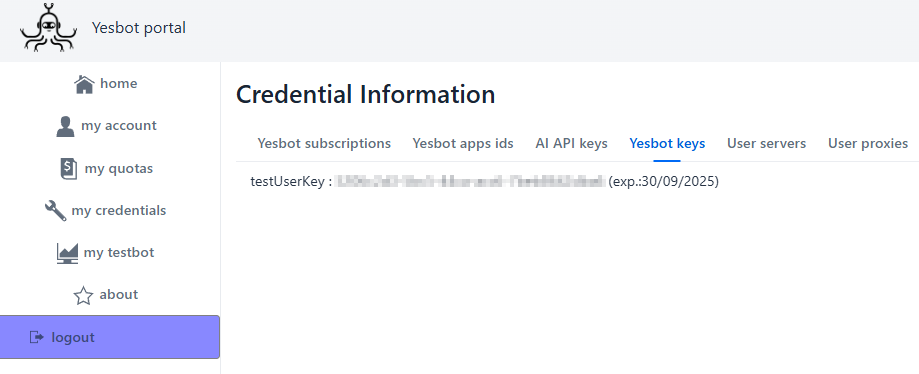
- Change testbotconf.client.key value. You can find it in your Yesbot account, in section «my credentials», then in tab «Yesbot keys». Copy the key value (without the date and spaces) in this view and paste it in your configuration file.
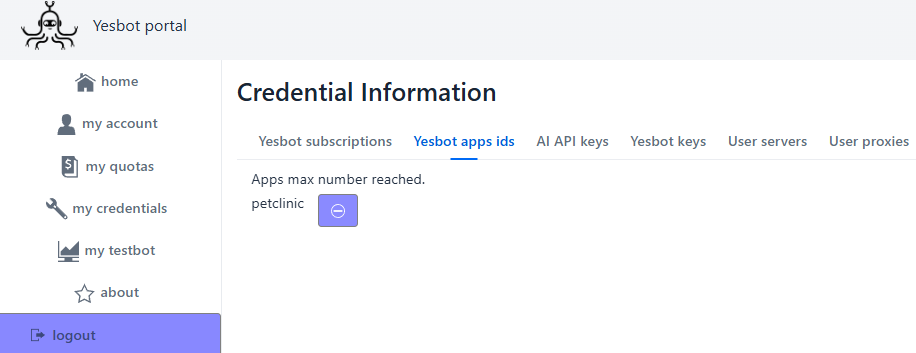
- Change testbotconf.client.app value. You can find it in your Yesbot account, in section «my credentials», then in tab «Yesbot apps ids». Copy the key value in this view and paste it in your configuration file.
2) Test your configuration
Once your have finished your backend configuration, then rebuild if necessary, and relaunch your backend application. Go to section «My Testbot», if your backend is running and properly configured, you will see the corresponding indicators set to on in the indicators bar, and also a «Discover tests» button in the buttons actions bar :

This means that your backend is properly configured.
Level 2 configuration (for idempotent write tests)
This feature allows to be able of running several times tests that modify the data in the database. Without this feature, only read-only tests are handled. Those tests are a bit slower because Yesbot will need to manage the database states. We assume that you have completed level 1 configuration before continuing.
Technological prerequisites
- Mysql database
1) Add configuration keys
In your application under test main configuration file (application.properties or application.yaml), make sure you are using a mysql server for your database persistence. For instance add the following keys and values :
spring.profiles.active=mysql,spring-data-jpa
database=mysql

...
# testbot config
...
testbotconf.backup=false
Simply switch your config to mysql, and set the value of testbotconf.backup from false to true.
2) Test your configuration
Once your have finished to change your backend configuration, then rebuild if necessary, and relaunch your backend application. Go to section «My Testbot», if your backend is running and properly configured, you will see the two «run with backup management» buttons in the buttons actions bar :

Level 3 configuration (for tests generation with a LLM)
This will allow to use GPT 3.5 model to create new tests inspired from previously tests, once you have generated basic tests using either basic tracking, or auto-discovery generated tests. We assume that you have completed level 1 or level 2 configuration before continuing.
Technological prerequisites
- Open AI API key already purchased and available
1) Add your OpenAI API key in your Yesbot account
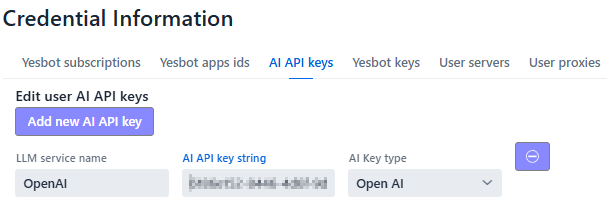
Go to your Yesbot account, in section «my credentials», then in tab «AI API keys», simply add a new key item, name it (for instance «Open AI»), paste your Open AI API key in the «AI API key string» field, and leave the «AI Key type» field to default value.
(Yesbot will not communicate your Open AI API key to any other third party than Open AI’s API service to generate new tests)
2) Test your configuration
Once your have finished to add you Open AI API key in your Yesbot account, then you’ll be able to use LLM generation in the «My Testbot» section of the Yesbot platform, by using the generation buttons in the buttons actions bar :

All done !
In the next sections, we’ll see how to create or generate new tests, and finally how to run them.